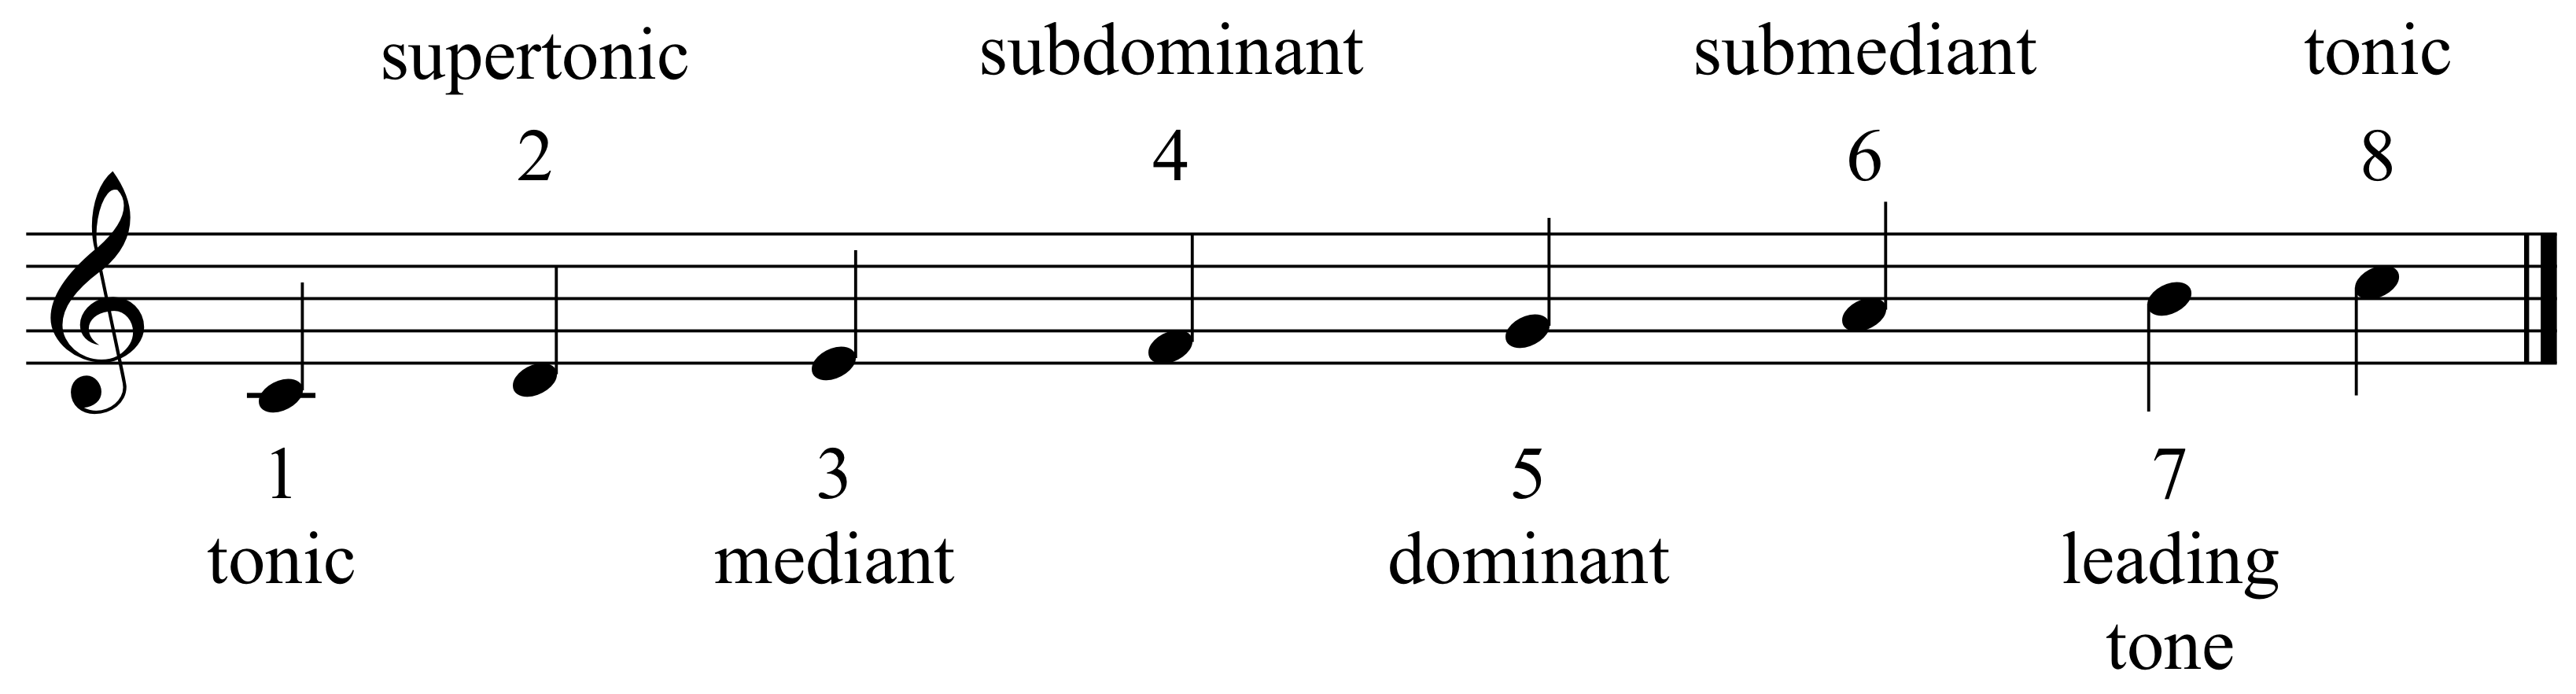
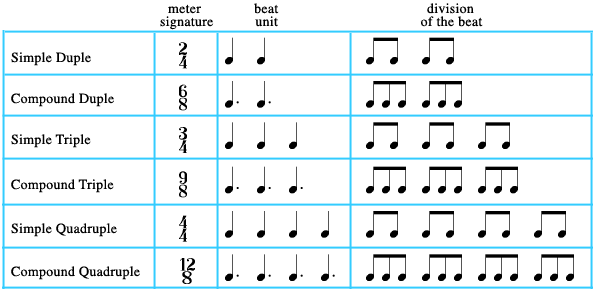
Blog

The difference between simple meter and compound meter

Simple meter:

The simplest way to explain a simple meter is that each beat in a simple meter is felt separately. The most common ones are 4/4, 3/4 and 2/4. On 4/4 we have 4 counts per bar and each count is a quarter note. But when playing this, we can easily feel each beat separately, count each beat separately, tap each beat separately and  hence they are dubbed as simple meters. Along with 4/4, 3/4 and 2/4 we can also label 4/2 and 4/8 as simple meters. For example, 4/2 would be 4 half notes per bar. You can still feel and count each note separately but the note duration is a little longer. So one count in 4/2 will be twice as longer as in 4/4. To graphically represent this, see the following two examples.

4/4         Count 1  2  3  4

4/2         Count 1      2       3        4

They are much more spaced out in 4/2. Where as in 4/8 there will be four 8th notes therefore the count will be twice as fast than 4/4.

4/4         Count 1  2  3  4

4/8         Count 1234

Same is true for 3/2. 3/8 and 2/2, 2/8.

The bottom line about simple meters is that 1. You can feel each beat separately and 2. the way we count the beat and the way we feel the beat are the same. Any meter that starts with 2.3 or 4 are simple meters.

Compound meter:

A meter is called compound when its counted in a certain way but felt differently. When how it is counted and how the beats are felt seem different, we call that a compound meter. 6/8 is often taken as an example to demonstrate what happens in a compound meter.

Technically, 6/8 means there are 6 counts per bar and each of them are 8th notes, so 6 eighth notes. It will be counted as the following:

6/8  Count 1 2 3 4 5 6

However, when you play this, you will realise that it doesn’t feel like 6 straight counts rather the groove will feel as following

6/8   Groove 1 2 3 1 2 3

It will feel like two groups of 3 beats as opposed to one large group of 6 beats. Because of this subdivision within the group that one can feel, these meters are called compound meters.

So on the same note, a 12/8 will not feel like 12 straight 8th notes per bar. Rather it will feel like the following

12/8  Count      1 2 3 4 5 6 7 8 9 0 11 12

12/8  Groove    1 2 3 1 2 3 1 2 3 1 2 3

It will feel like 4 triplets. What about a 9/8 meter? What do you think it should feel like?


Note duration

One of the key advantages of staff notation over guitar tabs is that tabs can only dictate the notes that are supposed to be played, but without the help of staff notation, it can’t explain the timing of that melody.  Understanding note duration therefore is very crucial to learn and comprehend staff notation which has certain obvious advantages over guitar tabs.

The five note durations we need to learn are WHOLE, HALF, QUARTER, EIGHTH and SIXTEENTH. An easy way to understand this is to just remember that we keep dividing the duration of a note in half as we move from whole note. So in case of a whole note, the duration is 4 beats. For a half note its 2 (4/2=2), for a quarter note it is 1 (2/2=1), for an 8th note it is half a beat (1/2) and for 16th note, it is 1/4th of a beat (1/2 /2 = 1/4).

The signs are as following

See how the 8th note has one flag and the 16th has 2 flags on it. It is possible to have notes with 3 or more flags and you can guess those notes will have even shorter duration but they are rarely use in contemporary music.

Basics of time signature and the difference between 4/4 and 2/2

Time signature, often also referred to as ‘meter’ sets the groove of the song. The common as well the simplest one of all is the 4/4 timing. The first number or the numerator refers to how many counts or beats there are in one bar and the second number, the denominator refers to the duration of each count or each beat. Therefore a 4/4 time refers to 4 beats in each bar and each beat getting a duration of (1/4) quarter note.

On the same note, a 3/4 time refers to 3 beats per bar and each beat having a value equal to a quarter note. In simple terms, on 3/4 timing, there will be 3 counts in each bar. This time signature is commonly known as waltz time.

A 2/4 then will have 2 counts in each bar. This is often referred to as march time as this mimics the sound of marching (1-2.1-2.1-2…)

Now things get interesting if we change the denominator. For example if you take a 2/2, it says there are two beats per bar and each beat is equal to (1/2) half note. Now a half note has twice the value of a quarter note. So 2 half notes is basically the same as 4 quarter notes, so where is the difference between these two?

Technically, duration wise, there is no difference. But how we play this and how it feels altogether is certainly different. Let me put the 4/4 and 2/2 in tandem

4/4       1  2  3  4| 1  2  3  4

2/2       1      2     | 1      2

On 4/4, a musician is likely to tap the foot on all 4 beats, accenting the strum on all 4 beats where as in 2/2 there will only be two taps, two beats and therefore two accents. The bigger space between the accents in 2/2 creates more swing than it will have in 4/4. So even though the difference is very subtle, there is a difference indeed.

Scale Degree

We have covered major and minor scales, also studied the relationship between both. But each note in a scale has its own importance and a certain name. That name is referred to as scale degree which implies the role of that note in that scale. Lets take the key of C major as an example which has the following notes:

C D E F G A B C

Here C, the first note in the scale is called the TONIC. Some people also refer to that as the root note.

The second note is called SUPER TONIC, which in this context is D. ‘Super’ in latin stands for ‘Above’.

The third note is called the MEDIANT. In this example it is E.

The fourth note is called the SUB DOMINANT which is the F.

The fifth note is called the DOMINANT. Notice that the mediant falls right in the middle between the Tonic and the dominant note, hence the name mediant (middle).

The sixth is called the SUBMEDIANT, which in this context is A. Again notice that the submediant sits right in the middle between the subdominant (F) and the tonic (C) of the next octave.

All these 6 degrees are the same for both Major and Minor scales. But the degree of the 7th note is different for both Major and Minor.

In Major key, the seventh note is called the LEADING TONE which in this context is B. Notice that the 7th note is just half step lower than the Tonic (C) and if you play the scale, it has a tendency to lead into the tonic. That is why it is called the LEADING TONE. You can apply these ideas not only for the notes but also for the underlying chords that fall in the key of C.

In the minor key, if we take A minor as an example, which is also the related minor of C major, we have the following notes:

A B C D E F G A

Notice that the 7th note here is G, which is one whole step under the Tonic (A). Therefore it doesn’t have the same characteristic as the leading tone of a major scale. Instead of calling this a leading tone, the degree of the 7th note in minor key is called the SUB TONIC.

5 essential tips to become a successful guitar player

I have been giving guitar lessons for more than 10 years now and over the years, I have noticed certain traits that make people successful with the guitar.  By success, I don’t mean how many followers one has on Instagram. Success on social media can often be misleading as I know many musicians who are at best average with thousands of followers. And similarly on the other spectrum, many extremely talented musicians getting less than the social media exposure they deserve. By success, in this context, I purely mean the raw skills and musical talents one has in her/his repertoire.

Following are the five tips I have for all the guitarists out there as I have noticed people with these traits tend to improve much faster.

1.Practice everything slowly:

I can’t stress this enough. In fact this alone can make up the first three of five tips that one needs to follow. Playing fast from set go never really gives those delicate muscles of the fingers to build the motor skills accurately.  The result is inadequate control and sloppy skills. The slower you are to play something, the more you are  forced to pay attention to the minute details, more strain on the finger muscles. This also forces one to work extra hard to stay on time and build a good sense of rhythm.

2. Make your whole body a metronome:

Practising slow leads to the next important feature of a good practice, which goes contrary to what most people would say but I beg to differ on this. And that is, don’t use a metronome when you are practising. At least not during the early stages of learning guitar. Rather work to create an inbuilt metronome. And the only way to do that is to feel the rhythm, not just listening to the clicks of a perfectly timed metronome. What you need to do is tap your foot and play, or move your body, bob your head, something to feel the music and the rhythm. A metronome doesn’t allow that to happen. Surely metronome has its place in practice and a very helpful tool but I have seen people who work to build this habit of feeling the rhythm improve a lot faster than people who don’t.

3. How long you have been playing guitar means very little:

There seems to be a weak correlation on how many years one has been playing guitar for and the quality of ones guitar playing skills. Rather it is the amount of time spent practising and the quality of the practice that count. Someone who has been practising an hour a day, having new practice materials to work on will inevitably end up being a better guitar player than someone who has been playing for 5-6 years or even longer, when playing guitar is mostly consisting of  randomly playing some songs and not carefully working on the skills. The bottom line of this is that the quality of practice is so much more important than how long one has been playing for.

4. Get a guitar teacher:

Yes there are tons of online materials, online guitar courses and much more and they do help. One can certainly learn how to play from those sources and they are often very cheap and some are completely free. Saying that, if you can afford the lessons, there is nothing better than having face to face lessons with a qualified guitar teacher. The premium price one pays for private guitar lessons also yields premium results. Every accomplished guitar player out there had a mentor, a guide who helped them become who they are. Even the ones who claim to be self taught actually received adequate guidance from someone experienced and skilled. You don’t see a world class athlete without a coach, same applies in music. What makes a good guitar teacher is another discussion but a good guitar teacher can offer you a time machine, take your playing and skills years ahead than it would be without a teacher.

5. Repetition:

There is this famous quote of Bruce Lee “I don’t fear a man who practised 10,000 kicks once, rather fear the man who practised one kick 10,000 times”. The same applies for guitar. You need to practice the same thing over and over for countless number of times. It will get boring, often the exercises are discordant and got no melody in it, yet one needs to sit down and keep repeating that same thing  day after day, month after month and year after year. If one quickly gets bored repeating the same thing and constantly in the need to play something new, will most likely end up lacking the skills to put up a good performance. Patience during the early stage of learning yields so much more benefit at the later stage as learning new songs become way easier.

The key of G and E minor

The second key we study in music theory after the key of C is the key of G. Unlike C, where we have all natural notes, we have one sharp in G that is the F#. And because it has only one sharp, this is the key that we cover after the key of C. A good way to remember this is to take reference from the circle of 5th. But since that hasn’t been discussed yet, a mnemonics can help to remember the fact that in the key of G, we replace F with F#.

The other easy way to remember is that the note that comes right before G, which is F is the one that needs to get replaced by F#. Therefore, the notes we have in G are G A B C D E F#. And just like all other major keys, G also follow the same order of chords. Remember which chords are major chords in a major key? What about the diminished?

And what about the related minor of G major? That should be the 6th degree of the key of G, and that is……………………………………………..E minor.

Popular major progressions

Following are some of the popular progressions used in numerous songs. It’s a good practice to memorise these progressions at all times. Also note that these chords can be played in any order and doesn’t necessarily have to be how they are written here. Try making different combinations and explore the different sounds you can create using these chords.

Contemporary: 

IV-iii-ii-I

I-vi

I-V-vi-IV

IV-V-vi-IV-V-I

Turn around:

iii-vi-ii-V

Blues:

I7-IV7-V7-I7

Jazz:

IM7- vim7-iim7-V7

iim7-V7-IM7


The key of C

The key of C is usually the first key covered in any music study. It doesn’t have any accidental meaning there are no sharps or flats, only natural notes. Therefore in the key of C, the notes are C D E F G A and B. The order of chords follow the same rule as any other major chord which is I, IV and V being major chords, ii, iii and vi being the minor chords and vii being the diminished one. The chords in the key of C are as following:

I (C)

ii (Dm)

iii (Em)

IV (F)

V (G)

vi (Am)

And

vii (Bdim)


Difference between Major and Minor scales

The three notes that create the distinction between Major (Ionian mode) and Natural Minor (Aeolian mode) scales are 3rd 6th and 7th. One easy way to remember this is that on MAJOR, as the name suggests, we have all the larger intervals. Whereas in minor, those 3 notes get flattened, resulting in shorter intervals, hence called MINOR.

For example, the key of C contains the following notes: C D E F G A B

Flattening the 3rd, 6th and 7th, we get C D Eb F G Ab Bb

Related minor: 

However there is a relation between a Major and Minor scales as every Major key has a related minor and vice versa.  Looking at it from the perspective of a major key, the 6th degree of the Major key is its related minor. So again going back to the key of C, the 6th degree is A minor, therefore A minor is the related minor of C major. What it means is that both C major and A minor scales share the same identical notes. The difference however is in the voicing as in C major, the tonal centre or root is that C note (C D E F G A B) and in A minor scale the tonal centre or root is the A note (A B C D E F G). If you look at this from the minor key then it is the third degree of the minor key that represents the related major key. In the key of A minor, the third is C, which is the related major of A minor key.

The following two rhymes may help to memorise the differences between Major and minor keys:

  1. “To make major and minor even, change three six and seven”
  2.  “The chord six, gives major a minor fix”

Stretches and hand exercises for guitar players

Playing guitar is mentally, as well as physically quite challenging. A guitar player needs to look after both her/his hands. The idea is to keep it loose and economise the movements on both hands. The more effort and energy it take to play something, the sloppier it’s going to sound and more susceptible to injuries. Repetitive stain injury (RSI) and tendinitis are not very common, but both are possibilities for performing guitarists or anyone who practices for long hours.

If your work is physically challenging and puts a lot of strain on the hands, require a lot of grip strength, you need to take extra care of your hands. Make sure to properly warm up, stretch and provide adequate rest between the practice sessions. I used to box when I was a teenager and at one point realised, I can’t do both guitar and boxing. Injuries and pain on the hand from boxing hindered my guitar practice immensely. I had to pick between being a no name boxer or somewhat of an accomplished musician and the choice was very easy for me.

The following video provides some of the stretching exercises I do before and during a practice/performance. Notice how the stretches and hand exercises are slightly different for the strumming hand. Make sure to perform these if you are practising for long hours and preferably before each practice session.